

What does this project do?
We build a system that measures the moisture of the soil in a flower pot and warns you when the soil gets dry. If the soil is moist enough, the green LED is on. When the soil dries out, the red LED turns on and the buzzer beeps every few seconds to say “water me”. The moisture level is also shown as a percentage in the Serial Monitor.
- Age group: 10 and up
- Level: Beginner
- Time: About 40 minutes
- What you will learn: reading an analog sensor, calibrating a sensor, converting a raw value into a percentage, switching the sensor’s power to make it last longer
Parts list
| Part | Qty |
|---|---|
| Arduino Uno (or compatible) | 1 |
| Soil moisture sensor module (YL-69 / FC-28 or capacitive) | 1 |
| LED (1 green, 1 red) | 2 |
| 220 Ω resistor | 2 |
| Passive buzzer | 1 |
| Breadboard | 1 |
| Male-to-male and male-to-female jumper wires | ~10 |
| Flower pot and soil | 1 |
| USB cable | 1 |
Wiring
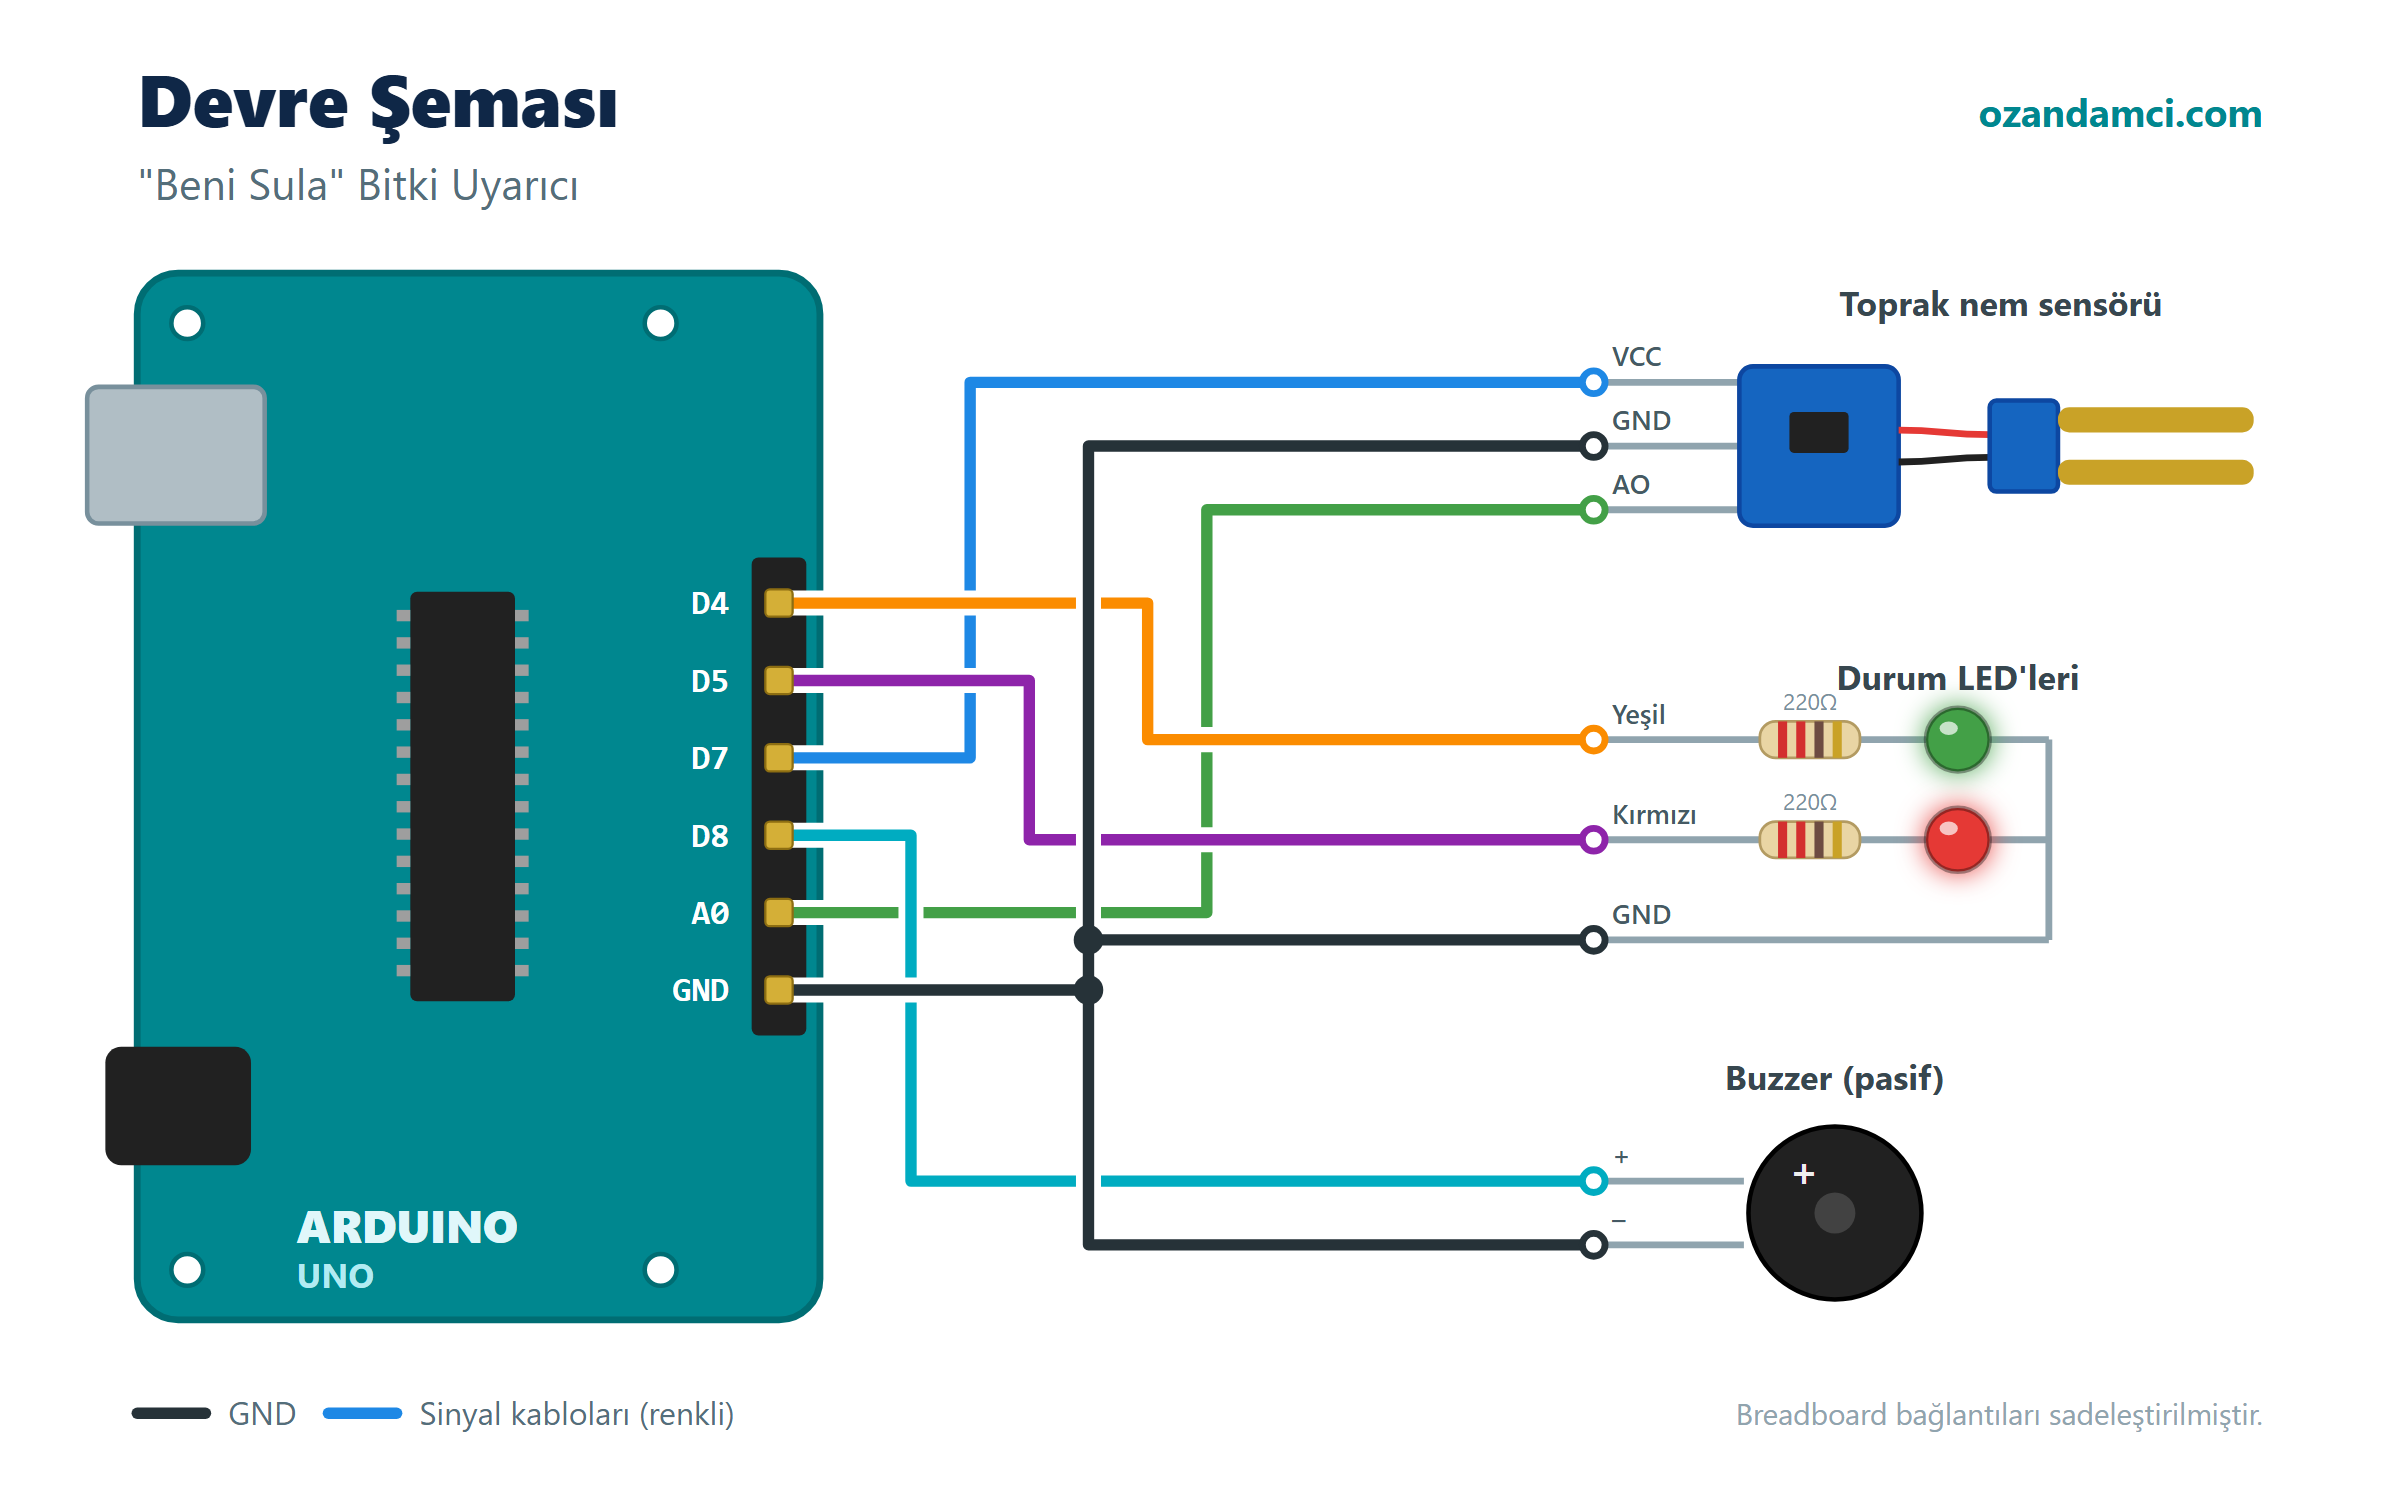
| Component | Component pin | Arduino pin |
|---|---|---|
| Moisture sensor | VCC | D7 (powers the sensor only while measuring) |
| Moisture sensor | GND | GND |
| Moisture sensor | AO (analog output) | A0 |
| Green LED | Long leg (through 220 Ω) | D4 |
| Red LED | Long leg (through 220 Ω) | D5 |
| LEDs | Short legs | GND |
| Buzzer | + (long leg) | D8 |
| Buzzer | – | GND |
We connect the sensor’s VCC to D7 instead of 5V. This way the sensor only gets power while it is measuring, and its metal probes corrode much more slowly in the soil.
Code
// Arduino Plant Alarm - ozandamci.com

const int sensorPin = A0;
const int sensorPower = 7;
const int greenLed = 4;
const int redLed = 5;
const int buzzerPin = 8;

// Calibration: measure with your own sensor and change these
const int dryValue = 850;    // sensor in the air / in dry soil
const int wetValue = 400;    // sensor dipped in water
const int waterLimit = 30;   // warn when moisture drops below 30%

void setup() {
  pinMode(sensorPower, OUTPUT);
  pinMode(greenLed, OUTPUT);
  pinMode(redLed, OUTPUT);
  pinMode(buzzerPin, OUTPUT);
  digitalWrite(sensorPower, LOW);
  Serial.begin(9600);
}

int readMoisture() {
  digitalWrite(sensorPower, HIGH); // turn the sensor on
  delay(100);                      // wait for the value to settle
  int value = analogRead(sensorPin);
  digitalWrite(sensorPower, LOW);  // turn the sensor off

  Serial.print("Raw value: ");
  Serial.print(value);

  int percent = map(value, dryValue, wetValue, 0, 100);
  return constrain(percent, 0, 100);
}

void loop() {
  int moisture = readMoisture();
  Serial.print("  Moisture: ");
  Serial.print(moisture);
  Serial.println(" %");

  if (moisture < waterLimit) {
    digitalWrite(greenLed, LOW);
    digitalWrite(redLed, HIGH);
    tone(buzzerPin, 1200, 150);
    delay(250);
    tone(buzzerPin, 1200, 150);
  } else {
    digitalWrite(greenLed, HIGH);
    digitalWrite(redLed, LOW);
  }

  delay(5000); // measure every 5 seconds
}
Step-by-step instructions
- Connect the sensor. Connect the fork-shaped probe to the small module. Connect the module’s VCC to D7, GND to GND and the AO pin to A0 (we don’t use the DO pin).
- Place the LEDs. Connect the green LED through a 220 Ω resistor to D4 and the red LED to D5; connect the short legs to GND.
- Place the buzzer. Connect its long leg to D8 and its short leg to GND.
- Upload the code. Choose your board and port, then click Upload.
- Calibrate. Open the Serial Monitor. Put the raw value you see with the sensor in the air into
dryValue, and the value you see when you dip the sensor in a glass of water (only the fork part — don’t get the module wet!) intowetValue. Upload the code again. - Put it in the pot. Push the sensor into the soil so that the fork part is fully buried.
- Test it. In dry soil, the red LED should light up and the buzzer should beep; a few seconds after you water the soil, the green LED should light up.
Troubleshooting
- Moisture always shows 0% or 100%: The calibration values don’t match your sensor; repeat step 5.
- The values work backwards (low when wet): On some sensors the value goes down when wet, on others it goes up. As long as you put the values you measured in the right places during calibration, the code works either way.
Try it yourself
- Add an LDR so the buzzer only warns you during the day and stays quiet at night.
- Turn it into a system that waters the plant by itself, using a small 5V water pump and a relay.


“Arduino “Water Me” Plant Alarm with Soil Moisture Sensor (Parts List and Code)” için 2 yorum