We build a small version of a car’s parking sensor with Arduino. The ultrasonic sensor measures how far away the object in front of it is. As the object gets closer, the LEDs change from green to yellow and then red, and the buzzer beeps faster and faster. When the object is very close, the buzzer beeps continuously.
Age group: 10 and up (middle and high school)
Level: Intermediate
Time: About 45–60 minutes
What you will learn: measuring distance with an ultrasonic sensor, making decisions with if–else, making sounds with a buzzer
Parts list
Part
Qty
Arduino Uno (or compatible)
1
HC-SR04 ultrasonic distance sensor
1
Passive buzzer
1
LED (green, yellow, red)
3
220 Ω resistor
3
Breadboard
1
Male-to-male jumper wires
~12
USB cable
1
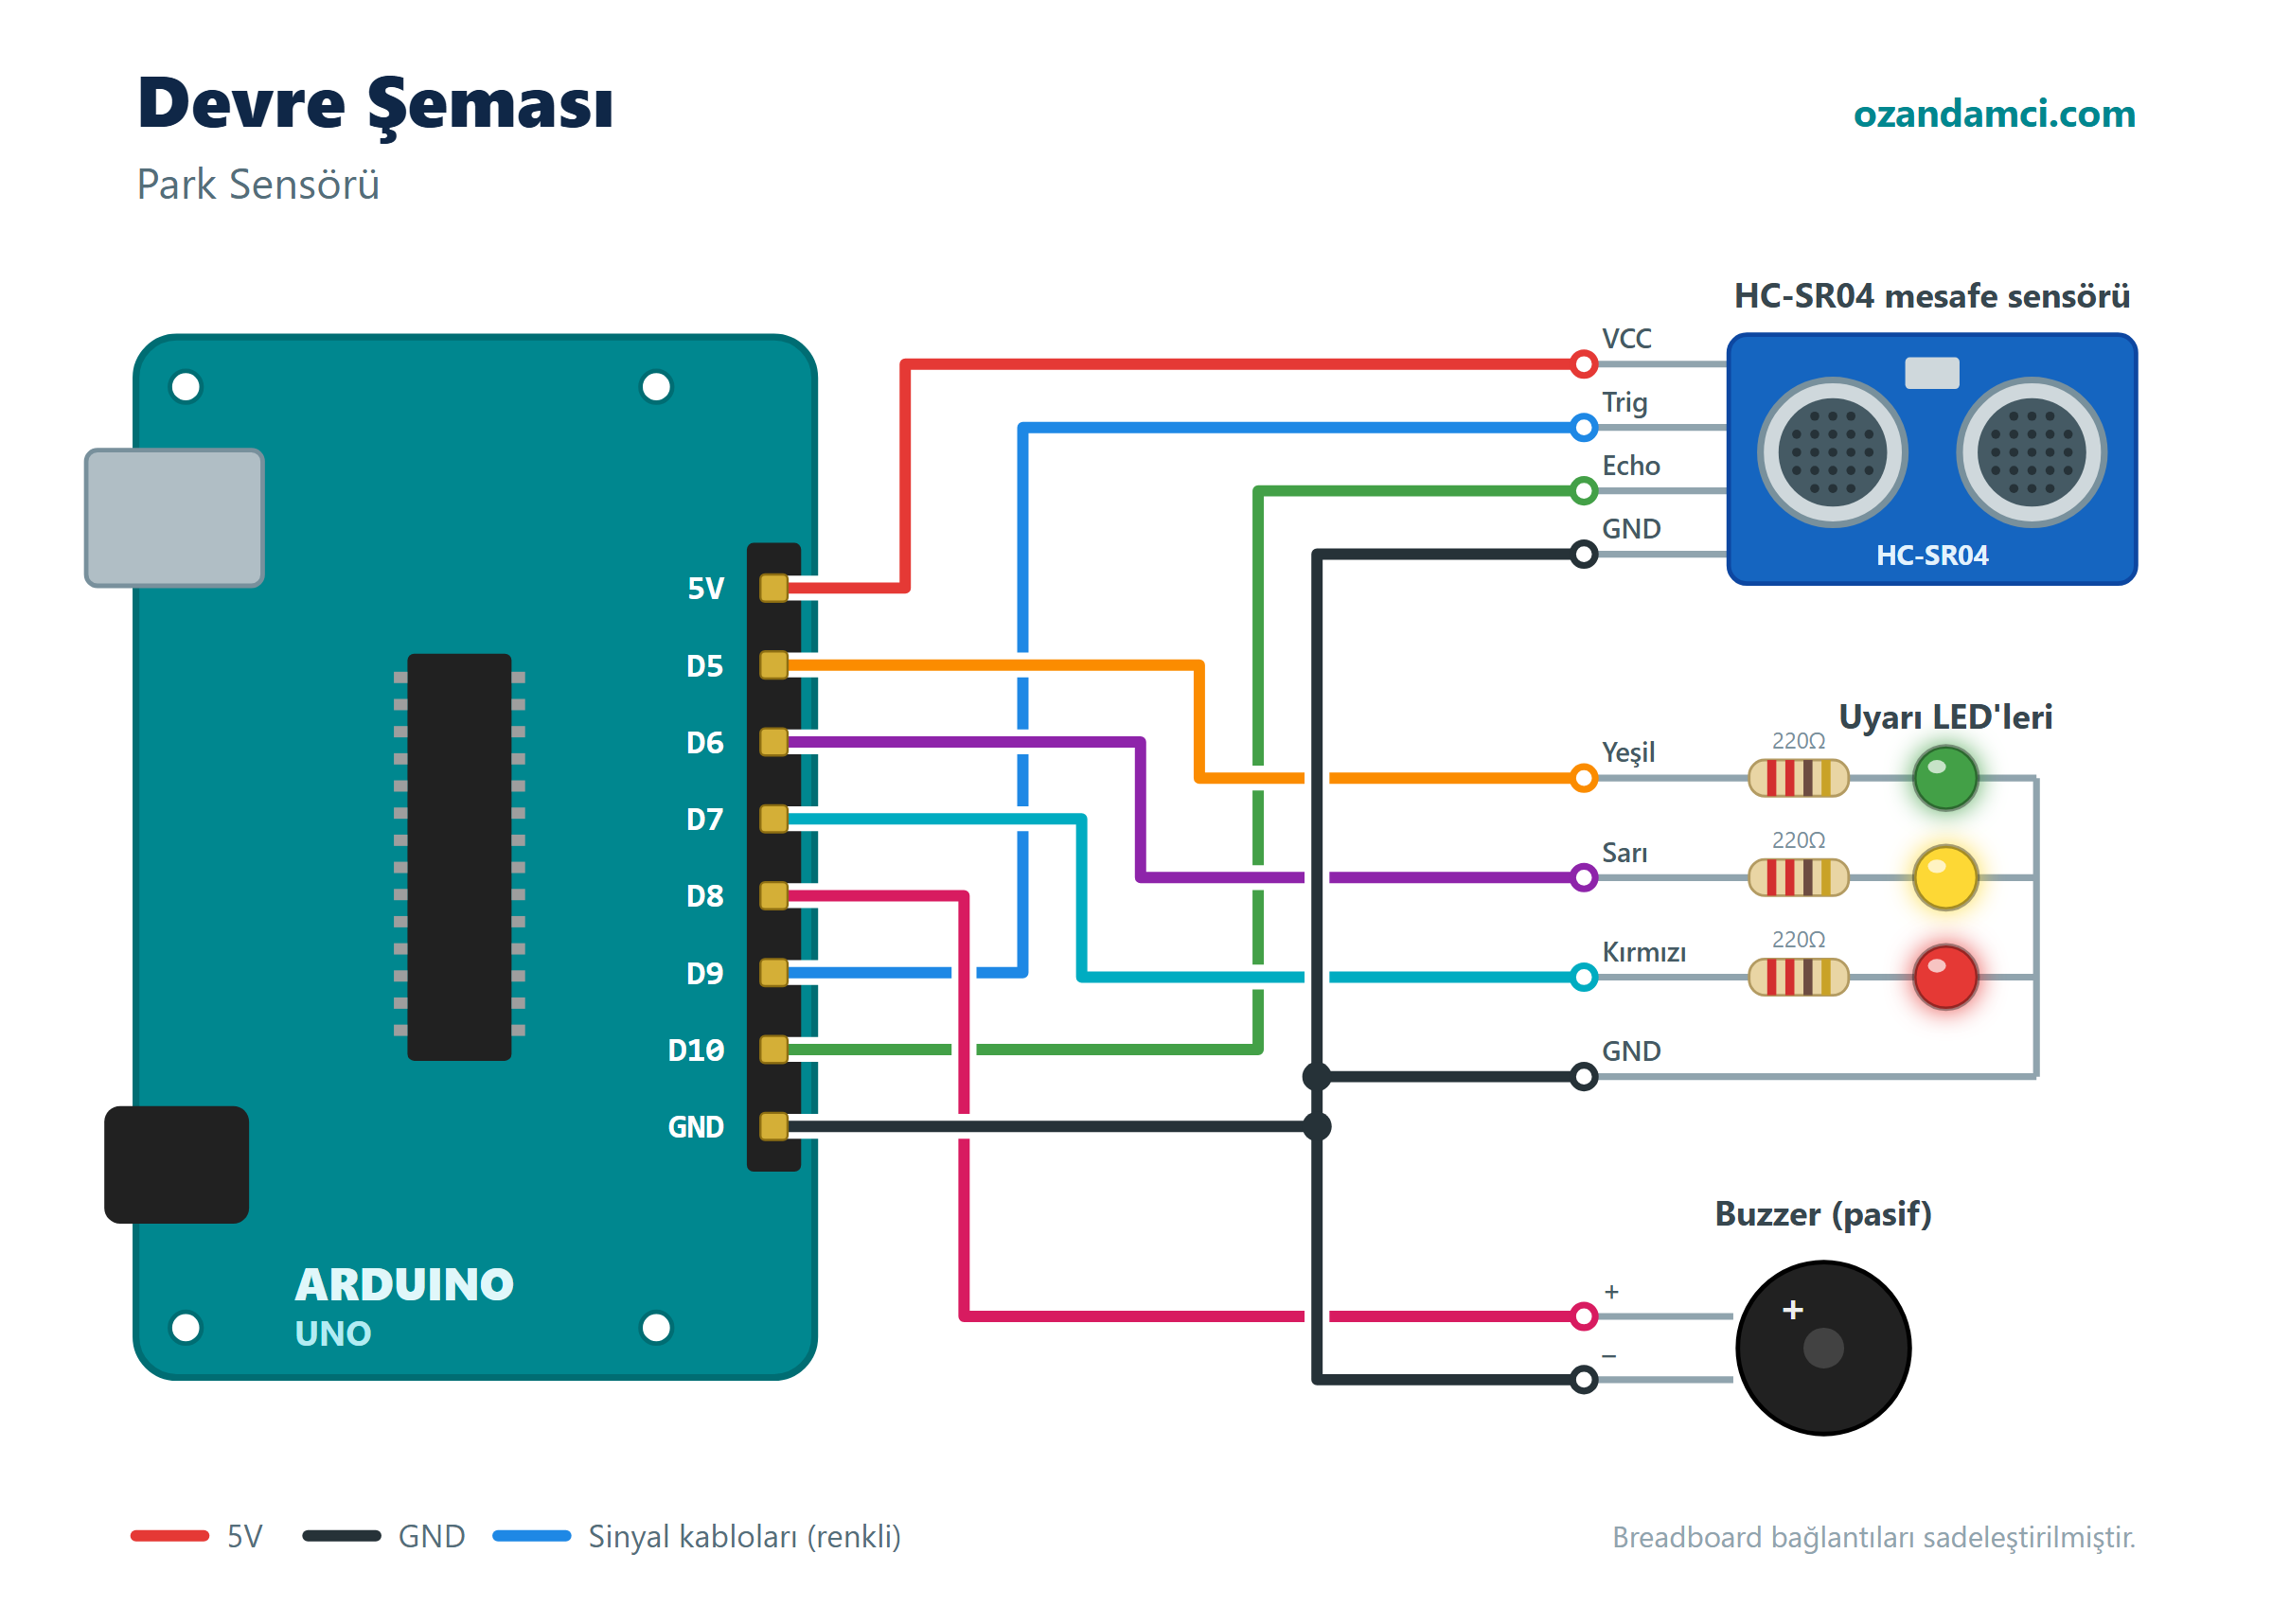
Wiring
Component
Component pin
Arduino pin
HC-SR04
VCC
5V
HC-SR04
Trig
D9
HC-SR04
Echo
D10
HC-SR04
GND
GND
Buzzer
+ (long leg)
D8
Buzzer
–
GND
Green LED
Long leg (through 220 Ω)
D5
Yellow LED
Long leg (through 220 Ω)
D6
Red LED
Long leg (through 220 Ω)
D7
LEDs
Short legs
GND
Code
// Arduino Parking Sensor - ozandamci.com

const int trigPin = 9;
const int echoPin = 10;
const int buzzerPin = 8;
const int greenLed = 5;
const int yellowLed = 6;
const int redLed = 7;

void setup() {
  pinMode(trigPin, OUTPUT);
  pinMode(echoPin, INPUT);
  pinMode(buzzerPin, OUTPUT);
  pinMode(greenLed, OUTPUT);
  pinMode(yellowLed, OUTPUT);
  pinMode(redLed, OUTPUT);
  Serial.begin(9600);
}

int measureDistance() {
  digitalWrite(trigPin, LOW);
  delayMicroseconds(2);
  digitalWrite(trigPin, HIGH);
  delayMicroseconds(10);
  digitalWrite(trigPin, LOW);

  long duration = pulseIn(echoPin, HIGH, 30000); // wait for up to ~5 metres
  if (duration == 0) return -1;                  // nothing in front
  return duration * 0.034 / 2;                   // centimetres
}

void setLeds(bool green, bool yellow, bool red) {
  digitalWrite(greenLed, green);
  digitalWrite(yellowLed, yellow);
  digitalWrite(redLed, red);
}

void loop() {
  int distance = measureDistance();
  Serial.print("Distance: ");
  Serial.print(distance);
  Serial.println(" cm");

  if (distance == -1 || distance > 50) {
    // Safe: green only, no sound
    setLeds(HIGH, LOW, LOW);
    noTone(buzzerPin);
    delay(200);
  } else if (distance > 20) {
    // Careful: yellow, slow beep
    setLeds(LOW, HIGH, LOW);
    tone(buzzerPin, 1000, 80);
    delay(map(distance, 20, 50, 150, 500));
  } else if (distance > 5) {
    // Close: red, fast beep
    setLeds(LOW, LOW, HIGH);
    tone(buzzerPin, 1500, 50);
    delay(map(distance, 5, 20, 60, 150));
  } else {
    // Very close: red, continuous sound
    setLeds(LOW, LOW, HIGH);
    tone(buzzerPin, 2000);
    delay(100);
  }
}
Step-by-step instructions
Place the sensor. Put the HC-SR04 on the edge of the breadboard with its “eyes” facing outwards.
Connect the power rails. Connect the Arduino’s 5V pin to the + rail of the breadboard and the GND pin to the – rail.
Connect the sensor. Connect VCC to the + rail, GND to the – rail, Trig to D9 and Echo to D10.
Place the LEDs. Connect a 220 Ω resistor to the long leg of each LED and wire green to D5, yellow to D6 and red to D7. Connect the short legs to the – rail.
Connect the buzzer. Connect its long leg to D8 and its short leg to the – rail.
Upload the code. Open the Arduino IDE and paste the code. Choose Arduino Uno from Tools → Board, choose the right port and click Upload.
Test it. Slowly move your hand towards the sensor. You should see the LEDs change colour and hear the beeping speed up. You can follow the measured distance in centimetres in Tools → Serial Monitor.
Troubleshooting
The sound never changes and it beeps all the time: Your buzzer may be an active buzzer. Use a passive buzzer, or for an active buzzer use digitalWrite(buzzerPin, HIGH/LOW) instead of tone().
The distance always shows 0 or -1: Make sure the Trig and Echo wires haven’t been swapped.
An LED doesn’t light up: The LED may be in backwards. The long leg must go to the Arduino pin.
Try it yourself
Change the distance limits (50, 20, 5 cm) to adapt the sensor to different situations.
Add a 16×2 LCD display and show the distance on it.
Mount the project on the back of a toy car.
Video
The narration is in Turkish. English subtitles are available: click CC on the video.



“Arduino Parking Sensor with HC-SR04 (Parts List, Wiring and Code)” için 2 yorum